
In the wild, canines have many ways to keep their nails trim. They’re constantly on the go over rough surfaces that gradually file nails down to an acceptable level.
Your dog might also experience some of that grinding on their daily treks over concrete sidewalks.
However, you can’t rely on physical activity alone to keep those nails well maintained.
Nail trimming is an essential part of dog grooming.
It doesn’t take much for the nails to get unruly and out of control. When that happens, you’ll have a lot more to deal with than just cosmetic issues.
Unkempt nails can cause tons of discomfort and some potential health issues.
Why Trimming Your Dog’s Nails is Important
Ideally, it’s best to trim your dog’s nails every two to four weeks.
When you don’t, you run the risk of exposing your dog to a host of potential problems.
Your pup’s nails aren’t like your own. If you encounter pain or discomfort around your nailbed, it’s pretty easy to avoid applying pressure or contact. Dogs aren’t that lucky.
Dogs use their feet for just about everything. As the nail starts to grow, it curls towards the floor. Eventually, you’ll begin to hear subtle taps every time your dog takes a step.
Those taps are more than just a minor annoyance. There’s a good chance that your dog is feeling unnecessary pressure on the nailbed.
The longer the nails get, the worse the discomfort becomes. It can eventually cause outright pain or arthritis.
The nails can form curls that completely change the way your dog stands and walks in severe cases. They might experience extreme pain in the muscles and feet, resulting in a hunched posture that makes it challenging to navigate your home.
All of those problems are bad enough. However, overgrown nails also develop an issue you’ll have to work around in the future: A long nail quick.
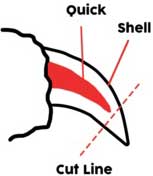
The nail quick is a bundle of blood vessels and nerves. If your dog has clear translucent light-colored nails, it’s the fleshy pink part that juts from the finger.
As the nail grows, so does the quick. Herein lies the biggest problem that dog owners face when trying to trim overgrown nails.
Even if you decide to take action and do something about the issue, a long quick can prevent you from providing relief.
You see, cutting into the quick is a harrowing event for your dog.
Many canines develop fears and anxieties about nail trimming for this very purpose. Remember: The quick has nerves in it.
Once cut, the quick can also bleed profusely, which only presents more problems moving forward.
Trimming your dog’s nails on a regular basis is the only way to prevent the quick from getting too long to manage. So, what happens if you’re already to that point?
How to Trim Overgrown Dog Nails
If your dog’s nails are already overgrown, you have a big challenge ahead of you. However, the good news is that the task is manageable with a bit of preparation and know-how.
#1. Gather Your Tools – Clippers vs Grinders
First things first: Get your materials in order. The last thing you want to do is scramble to find the right tools in the moment.
Dog nails are very different from your own. They’re conical and thick, making them impossible to cut with standard clippers.
Invest in a pair of specialty dog clippers. They have large, semi-circular blades that wrap around the nail and dig into them without much resistance. Many are scissor-style, making them easy to hold and use.
Alternatively, you can go for plier-style clippers. As the name would suggest, these tools look like pliers and often utilize springs or small gear systems to work.
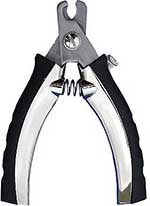
This style of clipper usually has a guillotine blade. A small hole provides just enough room to slip the nail through.
When you pull the plier handles together, the blade squeezes down and cuts through.
The efficiency of plier-style clippers varies. Some are sharp enough to cut through the nail like butter.
However, others can cause too much pressure and end up pinching the nail instead.
If you go with this style, make sure you’re getting a high-quality model to avoid hurting your dog.
Grinders
Another tool we recommend buying is a nail grinder. Grinders are a great way to overcome clipping anxieties on your end.
They’re a little less jarring, too. Instead of a sudden clip, you can gradually file the nail down to an acceptable length.
Groomers like to utilize grinders as well. You’ll often see them using them after the clippers to fine-tune the shape and create a smoother finish.
The final piece of gear you should have on hand is styptic powder. Readily available at most pet stores, a styptic powder is a clotting agent.
It’ll help stop the bleeding if you accidentally cut into the quick.
#2. Make Your Dog Comfortable
Now, let’s move on to the actual cutting process.
Start by making your dog comfortable with the process. If your dog has had bad experiences in the past or has gone a long time without a trim, there might be some trepidation.
Be gentle and give your dog a chance to get comfortable. Let them investigate the tools on their own. Then, hold their paws and touch the nail with the clipper.
Praise your pooch every time they have a positive reaction to the process.
If you’re using a grinder, turn it on so that they can get used to the noise.
Getting your dog comfortable with a nail trim can take a while. Just be patient. Never force your dog or go to great lengths to hold them down. Doing so will only create more anxieties.
Take the time to familiarize your pup with the process and move on to the next steps whenever they’re ready.
Related: Sedating a Dog for Nail Clipping
#3. Start Small
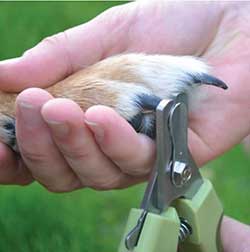
When they’re ready, hold onto your dog’s paw firmly. Don’t squeeze it. Instead, apply enough pressure to keep the nail steady.
If your dog has clear nails, examine it closely to locate the quick. You won’t have that luxury if your dog has black nails.
Either way, start small and make tiny cuts. Hold the clippers at a 45-degree angle and take off only a millimeter or so at a time.
Taking a gradual approach to trimming is crucial when the nails are overgrown. You want to avoid cutting the quick while still shaping the nail to its desired length.
Go slow and be gentle!
#4. Know When to Stop
You’ll know when to stop as you approach the quick.
There are a couple of ways to spot the quick as you get closer to it. For transparent or white nails, shine a light! You should be able to see the pink bundle of vessels very clearly.
In the case of dark-colored nails, you’ll have to rely on the cross-section of the nail itself. Look down at the nail where you’re trimming.
As you approach the quick, you should see a white ring around a black dot. That black dot is the very start of the quick, so stop trimming to avoid injury!
If you cut too much, don’t be surprised if your dog yelps out in pain and snatches its paw away.
Be gentle and apply the styptic powder to stop the bleeding as soon as possible.
Paying attention to the location of quick is paramount. Depending on how overgrown the nails are, you might only have the ability to cut a few millimeters off.
That’s OK.
Cut as much as possible without damaging the quick. Regular trims in the forward should help diminish the quick over time.
#5. Provide Plenty of Praise
As always, provide plenty of praise along the way!
Nail trimming is a scary event for dogs! Provide treats and some loving pats to normalize it a bit. Show your dog that there’s nothing to fear. Hopefully, they’ll begin to view it as nothing more than a minor nuisance.
Dealing with Dog Anxiety
Have a dog with a strong aversion for nail clipping? You’re not alone. Many dogs see the grooming task as unnatural and scary.
If you or a previous groomer had the misfortune of cutting the quick, the process could be a bit traumatic for your dog.
So, how do you overcome those issues? Here are a few ways you can make your dog more comfortable and accepting.
Use Exercise to Your Advantage
One option is to wear your dog out. Dogs are less inclined to put up a fit if they don’t have any energy left in them. Use that fact to your advantage!
Go on a long walk or have some fun outside. Once your dog is nice and tired, you can attempt to clip the nails. As long as you are gentle, your dog should be too tuckered out to fight you.
Start with the Hind Legs
Sometimes, all it takes is a less traumatic demonstration.
Start with the hind legs. Your pup might show some discomfort and anxiety. But, their sensitivity levels are usually lower in the hind legs.
Show Fido that there’s nothing to fear! Eventually, they may surrender their front paws for trimming, too.
Go to a Professional Groomer
There’s no shame in going to a professional groomer. If you have a particularly rowdy and fearful dog, a groomer may have the gentle touch they need to calm down.
At the very least, they can take care of the trimming while you distract your pooch.
Consult with Your Vet
As a last-ditch effort, you can always go to your vet.
Vets can provide some valuable tips on how you can get the job done. Many also offer nail clipping as a secondary treatment during surgery.
For example, you can get your vet to cut down overgrown nails whenever your dog goes under for their annual teeth cleaning appointment.
Your dog will be none the wiser, and you can adopt a trimming schedule moving forward to prevent the nails from getting overgrown ever again.
Over to You
Dogs have no way to trim their nails on their own. It’s up to you to take care of the task for them. Learning how to cut the nails while keeping your dog calm can make all the difference.
Be gentle, take your time, and offer up praise at every turn. If you stick to a regular trimming schedule moving forward, your dog will get used to the process.
As a result, future grooming sessions should be much more manageable.
Also Read:7 Best Dog Shampoos for Odor Control
